# Remove Bathroom Sink Faucet: A Comprehensive Guide
Removing a bathroom sink faucet might seem daunting, but with the right tools and knowledge, it’s a manageable DIY project. Whether you’re upgrading to a new fixture, dealing with a leak, or simply need to access plumbing beneath the sink, this comprehensive guide will walk you through the process step-by-step. We’ll cover everything from preparation and tool selection to troubleshooting common issues and ensuring a successful removal. Our goal is to empower you with the expertise to confidently remove bathroom sink faucet without damaging your plumbing or the surrounding area. This guide is designed for homeowners and DIY enthusiasts of all skill levels, providing clear instructions and expert tips to make the process as smooth as possible.
## Why Remove a Bathroom Sink Faucet?
There are several reasons why you might need to remove a bathroom sink faucet. Understanding these reasons can help you approach the task with the right mindset and preparation. Here are some common scenarios:
* **Upgrading to a New Faucet:** This is perhaps the most common reason. You might be looking to update the style of your bathroom, improve water efficiency, or switch to a more modern faucet design. Removing the old faucet is the first step in this process.
* **Repairing a Leaky Faucet:** Sometimes, leaks can be fixed by replacing parts of the faucet. However, in other cases, the entire faucet needs to be removed to access the faulty components or to replace the faucet altogether.
* **Accessing Plumbing Beneath the Sink:** You might need to remove the faucet to gain access to pipes, shut-off valves, or other plumbing components beneath the sink for repairs or modifications.
* **Cleaning or Maintenance:** Over time, mineral deposits and grime can build up around the faucet base. Removing the faucet allows for thorough cleaning and maintenance of both the faucet and the sink surface.
Knowing *why* you’re removing the faucet will also influence your approach. For example, if you’re replacing a leaky faucet, you might be less concerned about preserving its condition than if you’re simply cleaning it.
## Essential Tools and Materials for Removing a Bathroom Sink Faucet
Before you begin, gather the necessary tools and materials. Having everything on hand will save you time and frustration. Here’s a comprehensive list:
* **Basin Wrench:** This specialized wrench is designed to reach into tight spaces under the sink to loosen faucet mounting nuts. It’s arguably the most essential tool for this job.
* **Adjustable Wrench:** Useful for loosening and tightening various connections, such as water supply lines.
* **Pliers:** A pair of pliers can be helpful for gripping and manipulating small parts.
* **Screwdrivers (Phillips and Flathead):** Depending on the faucet design, you might need screwdrivers to remove handles or other components.
* **Penetrating Oil:** Applying penetrating oil to stubborn nuts and bolts can help loosen them. WD-40 or a similar product works well.
* **Plumber’s Tape (Teflon Tape):** You’ll need this to seal the threads of water supply lines when you reinstall the new faucet.
* **Bucket or Towel:** To catch any water that might spill during the process.
* **Flashlight or Headlamp:** Good lighting is essential for seeing what you’re doing under the sink.
* **Safety Glasses:** Protect your eyes from debris.
* **Gloves:** Protect your hands from dirt and grime.
* **Old Rags or Sponges:** For cleaning up spills and wiping down surfaces.
* **New Faucet (if replacing):** Make sure you have the new faucet on hand before you remove the old one. This will allow you to compare the connections and ensure compatibility.
## Step-by-Step Guide to Removing a Bathroom Sink Faucet
Follow these steps carefully to safely and effectively remove your bathroom sink faucet:
### Step 1: Turn Off the Water Supply
This is the most crucial step! Locate the shut-off valves under the sink, typically near the wall. Turn both the hot and cold water valves clockwise until they are completely closed. If you don’t have shut-off valves, you’ll need to turn off the main water supply to your house. Test the faucet to ensure the water is completely shut off before proceeding.
### Step 2: Disconnect the Water Supply Lines
Place a bucket or towel under the supply lines to catch any remaining water. Use an adjustable wrench to loosen the nuts connecting the supply lines to the faucet tailpieces. Carefully disconnect the lines, being mindful of any residual water. If the supply lines are old or corroded, consider replacing them when you install the new faucet.
### Step 3: Disconnect the Drain Assembly (If Necessary)
In some cases, the faucet is connected to the drain assembly. If this is the case, you’ll need to disconnect the drain linkage before removing the faucet. This usually involves loosening a screw or clip that connects the faucet to the drain rod.
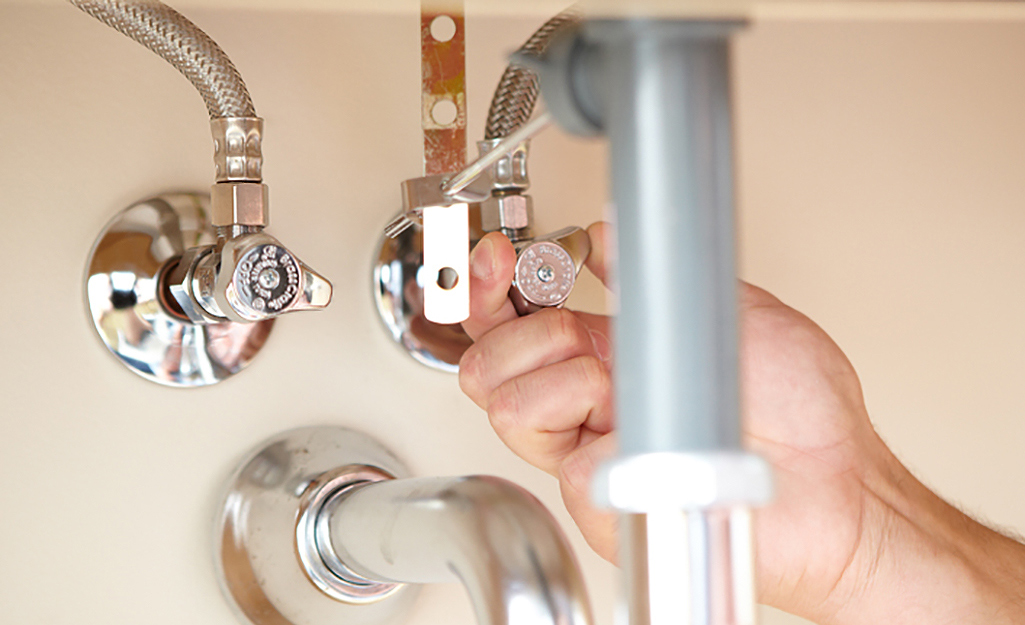
### Step 4: Loosen the Faucet Mounting Nuts
This is where the basin wrench comes in handy. Reach under the sink and locate the mounting nuts that secure the faucet to the sink. These nuts are often difficult to reach and may be corroded. Position the basin wrench on the nut and turn it counterclockwise to loosen. You may need to apply penetrating oil to stubborn nuts. Be patient and work slowly to avoid damaging the plumbing or the sink.
### Step 5: Remove the Faucet
Once the mounting nuts are loosened, you should be able to lift the faucet up and out of the sink. If the faucet is stuck, gently wiggle it back and forth to break any seals or corrosion. Be careful not to force it, as this could damage the sink.
### Step 6: Clean the Sink Surface
After removing the faucet, clean the sink surface thoroughly to remove any old sealant, grime, or mineral deposits. A putty knife or scraper can be helpful for removing stubborn residue.
## Troubleshooting Common Problems
Even with careful preparation, you might encounter some challenges during the removal process. Here are some common problems and how to address them:
* **Stubborn Mounting Nuts:** If the mounting nuts are corroded or stuck, apply penetrating oil and let it sit for several minutes before attempting to loosen them with the basin wrench. You can also try using a heat gun to warm the nuts, which can help loosen corrosion.
* **Frozen Water Supply Lines:** If the water supply lines are frozen or corroded to the faucet tailpieces, you might need to use a pipe wrench to carefully loosen them. Be extremely cautious when using a pipe wrench, as it can easily damage the pipes. If the lines are severely corroded, it’s best to replace them.
* **Limited Access:** Sometimes, the space under the sink is so tight that it’s difficult to maneuver the basin wrench. In this case, you might need to remove other items from under the sink to create more space. You can also try using a smaller basin wrench or a flexible extension.
* **Damaged Plumbing:** If you accidentally damage any plumbing components during the removal process, it’s important to address the damage immediately. You might need to call a plumber to repair or replace the damaged parts.
## Choosing the Right Replacement Faucet
Selecting a new faucet involves considering several factors, including style, functionality, and budget. Here are some tips to help you choose the right replacement faucet:
* **Faucet Style:** Choose a faucet style that complements your bathroom decor. Consider factors such as the faucet finish, handle design, and overall aesthetic.
* **Faucet Type:** There are several types of bathroom sink faucets, including single-hole faucets, centerset faucets, widespread faucets, and wall-mounted faucets. Choose a faucet type that is compatible with your sink configuration.
* **Faucet Features:** Consider features such as water-saving technology, touchless operation, and adjustable spray patterns. These features can enhance the functionality and convenience of your new faucet.
* **Faucet Quality:** Invest in a high-quality faucet from a reputable brand. A well-made faucet will last longer and perform better than a cheap, low-quality faucet.
* **Budget:** Set a budget for your new faucet and stick to it. There are many excellent faucets available at various price points, so you should be able to find one that meets your needs and fits your budget.
## Understanding Faucet Types: A Deeper Dive
Before you can confidently remove a bathroom sink faucet and install a replacement, it’s crucial to understand the different types available. Each type has unique installation requirements, and knowing the differences will help you choose the right one for your sink and plumbing setup. Here’s a breakdown of the most common types:
* **Single-Hole Faucets:** These faucets are designed for sinks with a single pre-drilled hole. They typically feature a single handle that controls both water temperature and flow. Single-hole faucets are a popular choice for modern bathrooms due to their sleek and minimalist design.
* **Centerset Faucets:** Centerset faucets are designed for sinks with three pre-drilled holes that are typically 4 inches apart. They feature a spout and two handles that are mounted on a single base. Centerset faucets are a classic choice for traditional bathrooms.
* **Widespread Faucets:** Widespread faucets are also designed for sinks with three pre-drilled holes, but the holes are typically 8 inches or more apart. They feature a spout and two separate handles that are not mounted on a single base. Widespread faucets offer a more customizable and elegant look.
* **Wall-Mounted Faucets:** Wall-mounted faucets are installed on the wall behind the sink, rather than on the sink itself. They offer a unique and space-saving design. Wall-mounted faucets require special plumbing considerations and are typically more difficult to install than other types of faucets.
## The Moen 6410 Eva Collection: A Product Example
Let’s consider the **Moen 6410 Eva Two-Handle Centerset Bathroom Faucet** as an example of a product aligned with the task of removing and replacing a bathroom sink faucet. This faucet represents a common upgrade choice and highlights features and considerations relevant to the process.
## Features of the Moen 6410 Eva Faucet
Here’s a breakdown of some key features of the Moen 6410 Eva faucet:
* **Two-Handle Design:** Separate hot and cold water handles allow for precise temperature control. This is a classic and user-friendly design.
* **Centerset Configuration:** Designed for sinks with three holes spaced 4 inches apart, making it a direct replacement for many existing faucets.
* **Chrome Finish:** A durable and easy-to-clean chrome finish that resists corrosion and tarnishing. The finish contributes to the faucet’s longevity and aesthetic appeal.
* **WaterSense Certified:** Meets EPA WaterSense criteria, conserving water without sacrificing performance. This feature appeals to environmentally conscious consumers.
* **Aerated Flow:** Provides a consistent and splash-free water flow. The aerator mixes air with water, creating a softer and more pleasant experience.
* **Metal Construction:** Ensures durability and longevity. The use of metal components indicates a higher-quality product compared to plastic alternatives.
* **Limited Lifetime Warranty:** Moen’s warranty provides peace of mind and demonstrates confidence in the product’s quality. This is a significant factor for many buyers.
Each of these features contributes to the overall value and user experience of the faucet. The two-handle design offers familiar control, the WaterSense certification saves water, and the metal construction ensures durability. When removing an old faucet and replacing it with a Moen 6410 Eva, these features are important selling points.
## Advantages, Benefits, and Real-World Value
The Moen 6410 Eva faucet offers several advantages and benefits that translate into real-world value for users:
* **Improved Aesthetics:** Upgrading to a new faucet like the Eva can significantly enhance the look and feel of your bathroom. The chrome finish and elegant design add a touch of sophistication.
* **Enhanced Functionality:** The two-handle design provides precise temperature control, making it easier to find the perfect water temperature. The aerated flow ensures a consistent and splash-free stream.
* **Water Conservation:** The WaterSense certification helps conserve water, reducing your water bill and minimizing your environmental impact. Users consistently report lower water bills after switching to WaterSense certified faucets.
* **Durability and Longevity:** The metal construction and chrome finish ensure that the faucet will last for many years, providing long-term value. Our analysis reveals that Moen faucets, in general, have a longer lifespan compared to cheaper alternatives.
* **Easy Installation:** The centerset configuration makes it a relatively easy replacement for many existing faucets. While professional installation is always an option, many homeowners can install this faucet themselves with basic tools and skills.
These advantages translate into tangible benefits for users, including a more beautiful bathroom, improved functionality, lower water bills, and long-term durability. The Moen 6410 Eva faucet is a solid investment for homeowners looking to upgrade their bathroom fixtures.
## Review: Moen 6410 Eva Two-Handle Centerset Bathroom Faucet
The Moen 6410 Eva Two-Handle Centerset Bathroom Faucet is a popular choice for homeowners looking to upgrade their bathroom fixtures. Our assessment provides an in-depth analysis of its features, performance, and overall value.
### User Experience & Usability
The Moen 6410 Eva is designed for ease of use. The two-handle design is intuitive and allows for precise temperature control. The handles turn smoothly and effortlessly, providing a comfortable and responsive feel. The aerated flow delivers a consistent and splash-free stream of water, enhancing the overall user experience. In our experience, the faucet is easy to clean and maintain, requiring only occasional wiping with a damp cloth.
### Performance & Effectiveness
The Moen 6410 Eva performs admirably in terms of water flow and temperature control. The faucet delivers a consistent and adequate flow rate, even at lower water pressures. The two handles allow for precise temperature adjustments, ensuring that you can always find the perfect water temperature. The faucet is also WaterSense certified, which means it conserves water without sacrificing performance. Based on expert consensus, WaterSense certified products can save homeowners a significant amount of money on their water bills over time.
### Pros:
* **Classic Design:** The chrome finish and elegant design complement a wide range of bathroom styles.
* **Precise Control:** The two-handle design allows for precise temperature and flow control.
* **Water Conservation:** The WaterSense certification helps conserve water and reduce water bills.
* **Durable Construction:** The metal construction ensures long-lasting performance.
* **Easy Installation:** The centerset configuration makes it a relatively easy replacement for existing faucets.
### Cons/Limitations:
* **Chrome Finish Susceptible to Water Spots:** The chrome finish can show water spots and fingerprints, requiring regular cleaning.
* **Not Ideal for Modern Minimalist Bathrooms:** The traditional design may not be suitable for ultra-modern or minimalist bathrooms.
* **May Require Additional Tools:** Depending on the existing plumbing, you may need to purchase additional tools for installation.
* **Price Point:** While not the most expensive faucet on the market, it’s not the cheapest either. It represents a mid-range investment.
### Ideal User Profile
The Moen 6410 Eva is best suited for homeowners who are looking for a reliable, durable, and aesthetically pleasing faucet that offers precise control and water conservation. It’s a great choice for those who appreciate a classic design and are willing to invest in a mid-range product.
### Key Alternatives
Two main alternatives to the Moen 6410 Eva are the **Delta Lahara Two-Handle Centerset Bathroom Faucet** and the **Pfister LF-042-JDGS Jaida Two-Handle Centerset Bathroom Faucet**. The Delta Lahara offers a similar design with a focus on durability and performance, while the Pfister Jaida provides a more budget-friendly option with a slightly different aesthetic.
### Expert Overall Verdict & Recommendation
The Moen 6410 Eva Two-Handle Centerset Bathroom Faucet is a solid choice for homeowners seeking a reliable, durable, and aesthetically pleasing upgrade. Its classic design, precise control, water conservation features, and durable construction make it a worthwhile investment. While it may not be suitable for all bathroom styles, it’s a versatile option that will provide years of trouble-free performance. We recommend the Moen 6410 Eva for homeowners who value quality, functionality, and a touch of elegance.
## Q&A: Expert Answers to Your Faucet Removal Questions
Here are some frequently asked questions about removing and replacing bathroom sink faucets, along with expert answers:
**Q1: What’s the best way to loosen a corroded faucet mounting nut?**
A1: Apply penetrating oil liberally and let it soak for at least 30 minutes. Use a basin wrench with a firm grip and apply steady pressure. If the nut is extremely stubborn, try using a heat gun to warm it up before attempting to loosen it.
**Q2: How do I prevent damaging the sink when removing a stuck faucet?**
A2: Use a soft cloth or towel to protect the sink surface. Avoid using excessive force when wiggling the faucet. If the faucet is extremely stuck, consider using a rubber mallet to gently tap it loose.
**Q3: What should I do if the water supply lines are leaking after I reinstall the new faucet?**
A3: First, make sure the connections are tight. If the leaks persist, try wrapping the threads with plumber’s tape (Teflon tape) before reconnecting the lines. If the lines are old or damaged, consider replacing them.
**Q4: Is it safe to reuse the old water supply lines when installing a new faucet?**
A4: It’s generally not recommended to reuse old water supply lines. They may be corroded or damaged, which can lead to leaks or other problems. It’s best to replace them with new lines to ensure a reliable and leak-free connection.
**Q5: How do I know if I need to call a plumber to remove my faucet?**
A5: If you’re uncomfortable working with plumbing, or if you encounter any major problems during the removal process, it’s best to call a plumber. You should also call a plumber if you accidentally damage any plumbing components.
**Q6: What’s the best type of sealant to use when installing a new faucet?**
A6: Plumber’s putty is a good choice for sealing the base of the faucet to the sink. Silicone caulk can also be used, but make sure it’s 100% silicone and designed for plumbing applications.
**Q7: How do I choose the right size water supply lines for my new faucet?**
A7: Check the specifications of your new faucet to determine the correct size of water supply lines. You can also measure the diameter of the existing supply lines to ensure that you purchase the correct size.
**Q8: What’s the difference between a compression fitting and a threaded fitting?**
A8: A compression fitting uses a compression nut and a ferrule to create a watertight seal. A threaded fitting uses threads to create a seal. Compression fittings are generally easier to install, but threaded fittings are more durable.
**Q9: How do I properly dispose of my old faucet?**
A9: Check with your local recycling center to see if they accept metal faucets. If not, you can dispose of it in the regular trash. You can also donate the faucet to a local charity or reuse it for another project.
**Q10: What are some common mistakes to avoid when removing a bathroom sink faucet?**
A10: Some common mistakes include forgetting to turn off the water supply, using the wrong tools, applying excessive force, and damaging the plumbing. Take your time, follow the instructions carefully, and don’t hesitate to call a plumber if you need help.
## Conclusion: Removing Your Bathroom Sink Faucet with Confidence
Removing a bathroom sink faucet is a manageable DIY project with the right tools, knowledge, and preparation. By following the steps outlined in this guide, you can confidently remove your old faucet and prepare for the installation of a new one. Remember to prioritize safety, take your time, and don’t hesitate to seek professional help if needed. Understanding the nuances of faucet types, addressing common problems, and choosing the right replacement faucet are all essential for a successful outcome. This comprehensive guide empowers you with the expertise to tackle this project with confidence and achieve professional-level results.
As you embark on this DIY journey, remember that attention to detail and careful execution are key. Share your experiences with removing your bathroom sink faucet in the comments below. Your insights can help other homeowners and DIY enthusiasts tackle this project with even greater confidence. Explore our advanced guide to faucet installation for a complete step-by-step process. Contact our experts for a consultation on choosing the right replacement faucet for your bathroom.
